
Using Agentic AI to Classify and Index Sports Images by Player and Team
Why do we need this?
If you are responsible for maintaining the media for your website, one of the challenges is making the assets searchable. One approach is to tag the assets or enrich them with metadata. In this article, I want to explore a common pattern seen on many organized sports websites: “Tag images by team and player based on their uniform.” This task is not easy:
- It requires computer vision capability to identify people.
- For each person, the system must recognize the uniform colors.
- It should be able to read the number on the jersey.
Using these basic capabilities, we need to identify:
- Is the person a player or a non-player?
- For each player, identify the team.
- Using the combination of the team and jersey number, identify the person.
The last part is critical since the face is often obscured by a helmet and other safety equipment.
In other words, this is a task that is perfect for AI!
Solution Approach
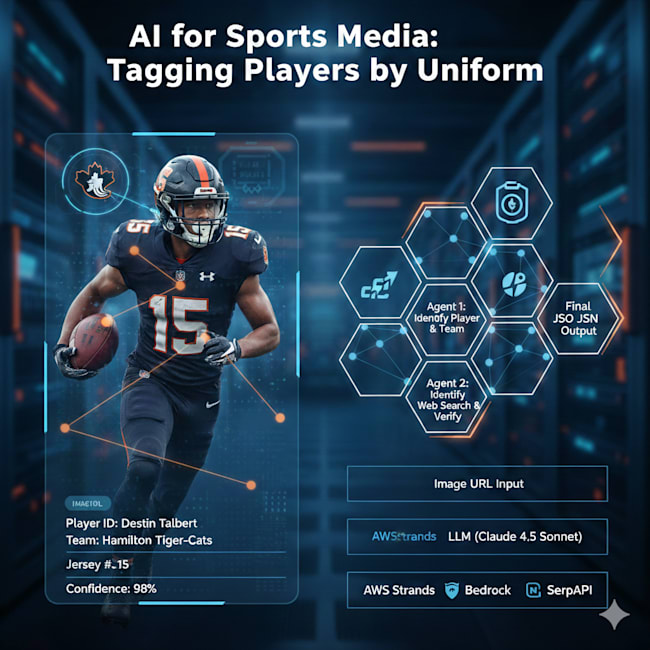
In my approach to this problem, I felt we can handle it using agentic AI. We need two primary agents:
- Agent 1: Identify individuals, their teams, and jersey numbers.
- Agent 2: For each player, perform a web search and identify the player.
[!TIP] In a realistic use case, Agent 2 may not be required. If you are the NBA/NFL or a team, you likely already have a database mapping jersey numbers to player names. We only need this if no such database is available.
In this article, I will be using a pure LLM-based solution.
Workflow
The code for player identification works as follows:
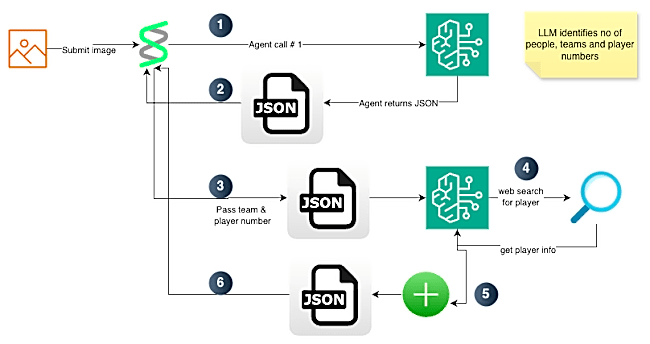
- The user submits an image URL for player identification.
- The request hits a backend running the AWS Strands agentic framework.
- The framework offers a tool called
image_reader. Using this tool, we download the image and convert it to bytes. - The framework then submits the request to an LLM.
-
In our use case, we are using LLM models on Bedrock. For simplicity, we use the default model, which happens to be Claude 4.5 Sonnet.
- The LLM identifies whether there are players in the image.
- For each player, it identifies the team and player number.
- In our prompt, we ask the model to extract other information like the primary colors on the player’s uniform and a confidence level for team and player number.
- The LLM returns the result. Strands then loops through each player and passes this information to the next agent. For each player, the LLM receives the team, player number, and a tool for web search.
- The LLM then runs a search and parses the results to identify the player.
- The LLM returns the player name and a confidence metric. Strands then stitches the JSON received from Agent 1 (step 2) and the JSON for player name into one final result.
- The final response is then sent back to the user.
Here is a high-level block diagram of the workflow.
Code Walk Through
The code is available on GitHub:
- https://github.com/akshayranganath/player-identification
[!NOTE] You will see extra files in the project. They were created while I was trying to learn Strands. This project also underwent changes. It started as a single-prompt system, then became a three-agent system, and finally evolved into a two-agent system.
In this project, I used uv. All secrets should be placed in a file named .env at the project root. Here are the core variables expected:
AWS_PROFILE=
AWS_DEFAULT_PROFILE=
SERP_API_KEY=
AWS_PROFILE and AWS_DEFAULT_PROFILE are needed for access to AWS services. I assume you already have AWS credentials configured. In my case, I am using a profile name for accessing the services.
SERP_API_KEY is needed for web search. You can obtain a free API key from https://serpapi.com/.
You can install dependencies and run the code with these two commands:
uv sync
uv run streamlit run app.py
Guardrails
To prevent the solution from hallucinating and from producing responses that are not structured, we rely on two items:
- A detailed prompt that defines the output format, along with a one-shot example JSON.
- In
utils.py, we run checks for valid JSON. In a production system, this would use a more robustpydanticmodel for type checking.
Execution Flow
For this use case, I am using the Canadian Football League. One of the reasons is that I can easily verify the output by checking against the public database of all players.
Let’s see an execution in action!
Test URL: https://static.cfl.ca/wp-content/uploads/Destin_Talbert_2025_002-800x451.jpg

When submitted, the system generates an output like the one below:
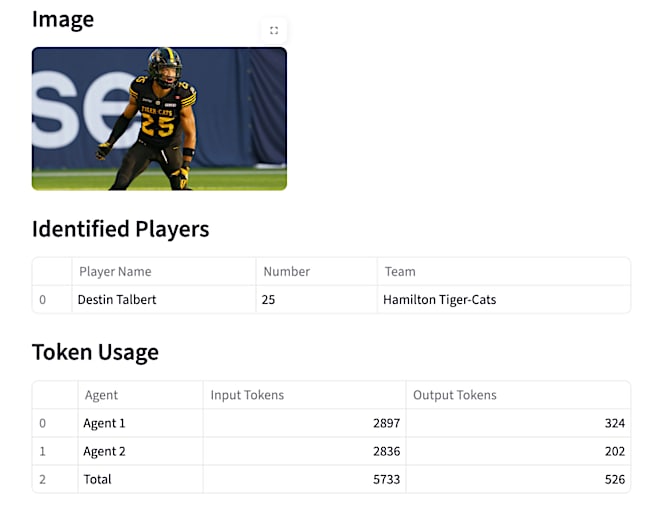
Along with the output, it will also clearly show token usage. This can be helpful in estimating costs for running the system in a long-term project.
Learnings
Working on this project helped me learn quite a few things about working with agents:
- When building code with tools like Cursor, make the agent think like a human. Start by adding a lot of debug messages. Remove them when the logic seems solid.
- Start with a good specification. If the initial spec is inaccurate or unclear, the code generated will not work.
- Don’t try to do everything with a single prompt. It is a setup for failure.
- Break the job logically. If you, as a human programmer, would keep two things separate, it probably maps to two agents.
- Start small and then keep iterating. Don’t try to build the entire system at once.
Here are some things I could have done differently:
- Start by having the system build a bunch of tests. This could have saved a lot of time testing through the UI.
- Use pydantic for type checking.
- Enhance this solution to run a perceptual hashing (pHash) step prior to sending the image to the LLM. Using this concept, I can cache the result. This will avoid costly requests to the LLM and provide faster responses to users.