
Getting Started with Python and DynamoDB
Recently, I was working on a problem that needed me to store a few GB of data. This was too much for a CSV file and I was looking at alternatives. Although I had read about NoSQL and DynamoDB before, I had never used it. Since I now had a use case, I thought of giving it a try.

While trying to work with DynamoDB and Python, I realized that the typical getting started video or documents focus a lot on the very specific task. For example, they may show you how to create a table using the UI with no explanation on how to create a table. I wanted to take a more holistic approach. I did not discover everything - so I’ll be linking to the full article that I referenced while I was building my solution.
Use Case
I work as a Solutions Architect at Cloudinary. I was on a project that required us to analyze a very large set (think millions) of images. The end goal was to run the images through an algorithm that can extract the text content (if any) and store it in some location. Once done, the text would be mined for certain patterns that was related to a customer’s use case.
For this purpose, I wanted to use the following:
- Cloudinary’s OCR add-on module for text extraction.
- Admin API to enable the add-on. I needed to do this since the images had already been uploaded to Cloudinary.
- Lastly, DynamoDB to store the mapping of the image and the text extracted from the image.
Why DynamoDB?
I had read about this database while preparing for my certification exams. Apart from that, I had never used it. So I thought this would be a great opportunity to try it out. When I tested it out, the setup was simple and working with Python was a breeze. If I had to work with MySQL, it would have required me to setup a database, a table and identified the different column types up-front. Auto-scaling and cost too would have been higher if I had opted for this approach.
I liked the simplicity of the setup. When creating a new database, all you have to specify is the partition key which is similar to the primary key of a SQL database. Apart from that, pretty much everything else is optional. Since I was testing this out, I started with the default settings and added the primary key as public_id. This is basically the image file URI (ie, the file path+file name on Cloudinary). For my setup, AWS said I would be charged a princely sum of $ 0.78 per month! Of course, this wouldn’t not hold true once I pumped in the data but, it was re-assuring that this was not an expensive solution.
How to work with DynamoDB?
Basic CRUD Operations
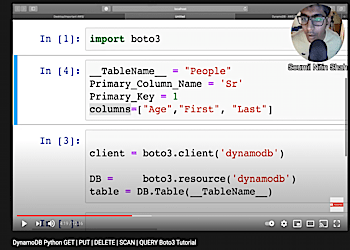
Just like most novices, my learning started with Google search. However, most search lead me to AWS documentation. Although it is very informative, it is very wordy. I wanted to jump straight to the point where I could make a call to retrieve and add new rows to my table. I found a video by soumilshah1995 on Youtube that did a great job. He shows the typical create-read-update-delete (CRUD) operations with DynamoDB. He has also helpfully published the code as a Jupyter notebook.
Query vs Scan
The next thing to understand is the concept of a scan vs a query. A query is where you can specify a specific criteria based on the primary key while a scan basically reads and compares against all rows of the table. Unlike regular SQL, DynamoDB can support duplicate partition key. However, in my case this wouldn’t work. I would be getting text from images and each image had a unique URI. So, I would have to end up running table scans.
However, if you are interested to understand this more, StackOverFlow has an excellent article. While exploring this, I ran into the concepts of Global Secondary Index and Local Secondary Index. I did not need this since my data would be used for limited period of time. Not using the indices would also save some cost at the expense of not offering performant querying capabilities.
Code Solution
Here’s my final solution. I pulled up a list of images that needed to be processed. To get list of images on an account, you can use either the Admin API’s resource method or the Search method. I loop over the list and enable OCR for each image. Since images were already uploaded, I had to use the Admin API’s Update mechanism. Note that this call has rate limits. So I had to add additional logic to ensure that my multi-threaded code remained within the rate limit. You can check my blog on rate limiting in Python to see this in action.
import cloudinary.api

resp = cloudinary.api.update(
    resource,
    ocr="adv_ocr"
)
From the response, I had to extract the field that held the text information. The OCR plugin first shows a summary of all the text followed by each text element and its bounding box. I just needed the summary. Here’s how this would work.
ocr_info = resp['info']['ocr']['adv_ocr']
if ocr_info['status'] == "complete":
    if 'data' in ocr_info:
        text_data = ocr_info['data'][0]
        if 'textAnnotations' in text_data and len(text_data['textAnnotations']) > 0 and 'description' in text_data['textAnnotations'][0]:
            text = text_data['textAnnotations'][0]['description']
If you want to try on terminal, you can save the output from enable OCR to a JSON file and run a jq query as follows:
cat ocr.json| jq '.info.ocr.adv_ocr.data[0].textAnnotations[0].description'
Finally, I had to update the database.
import boto3
def update_db(public_id, text = None): # removed other fields not relevant to blog post
    try:
        table.put_item(Item={
            'publicId': public_id,
            'text': text
            # ..  other fields not relevant for this blog.. #
        })
With this code, I was able to extract the OCR text and push it to a DynamoDB. Once this process completes, I plan to run some queries and extract the data as a CSV for long term storage.
Gotchas
While working with the use-case, I ran into a few issues and I thought of documenting them.
- Size restrictions: AWS imposes size limits on the primary key and composite keys. The limits are 1024 and 2048 bytes respectively. (Source) If you don’t consider this, inserts to database fill fail with the following error. Unfortunately, you can’t change the keys once the table has been created.
botocore.exceptions.ClientError: An error occurred (ValidationException) when calling the PutItem operation: One or more parameter values were invalid: Aggregated size of all range keys has exceeded the size limit of 1024 bytes
- Concurrency restrictions: You are constrained by the read and write capacity that is provisioned with the database. If you set it to be too low, you will see as below. To fix it, you will need to start increasing the write (or read) capacity for your database.
An error occurred (ProvisionedThroughputExceededException) when calling the PutItem operation (reached max retries: 9): The level of configured provisioned throughput for the table was exceeded. Consider increasing your provisioning level with the UpdateTable API.
- Working with Index: I thought using an index would be fun. So I created one for the table. However, I kept getting the error
Cannot read from backfilling global secondary index. According to StackOverflow, the error is supposed to go away within a few minutes. However, I saw this error even after 1 day after the last update to my database. So I simply ignored the index.
Hope you find this useful and try to take DynamoDB for a spin yourself!