
Performance Testing with Jenkins
In this blog post, I try to outline how Jenkins can be leveraged to perform Synthetic testing by using command line tool called Siege for automating the tests.
If you are looking to setup a synthetic testing with Jenkins, please read the blog about Synthetic testing with WPT and Jenkins.
Why Jenkins?
Jenkins is an excellent CI tool that has some really cool capabilities. One of the features I like is the scheduled build. It is very similar to a cron job. The place where it shines well is in managing the master/slave node execution. With Jenkins, you could designate an instance as the master and then enable it to run the different commands / processes on the slave nodes. This is the feature that helps in setting up synthentic tests.
What is the idea?
My idea is that for a DevOps oriented organization, Jenkins could be used to run either quick tests or a scheduled synthetic tests. The power comes in by leveraging the AWS geo-regions to perform a distributed tests for measuring the response times from various geographies.
How will it work?
Let’s assume that we are using Amazon EC2 instances. We could create EC2 instances across different geo. Depending on the kind of tests required, it could in each location offered by Amazon or it could be setup for tests in a particular geo. All these instances would be child nodes that will be enabled to execute the synthetic test from the Jenkins master node.
What kind of a test can Jenkins run?
I am still new to the world of Jenkins but, based on my understanding following types of tests could be executed:
- full suite regression test from a single node
- run a check against a set of URLs for synthetic monitoring
- run a check for geo-based content validation
- warm CDN cache across geographies, if using a CDN
Simple Demo
To prove that this idea can work, I leveraged Siege testing tool to execute a 10s load test on a single URL. This test was scheduled to execute every 10 minutes. I also enabled the logging with siege so that the historical set of results would be available for analysis.
I did not use a master / slave setup in this test. So the load test was running from the same instance as the Jenkins server.
Setting up the scheduled build
I set the script to run every 10 minutes. Here’s what this looks like:
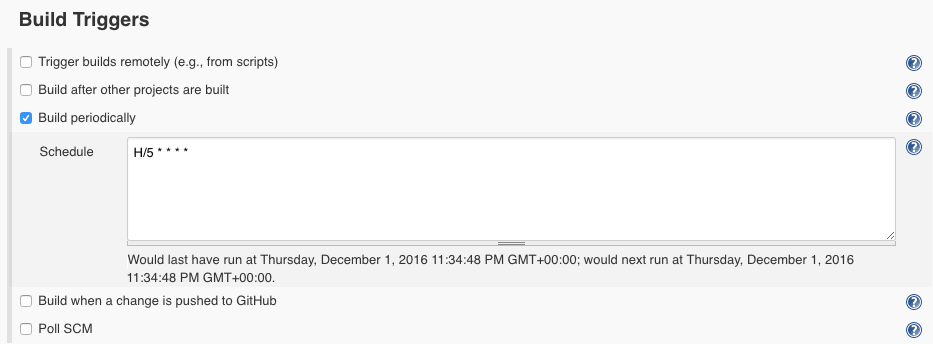
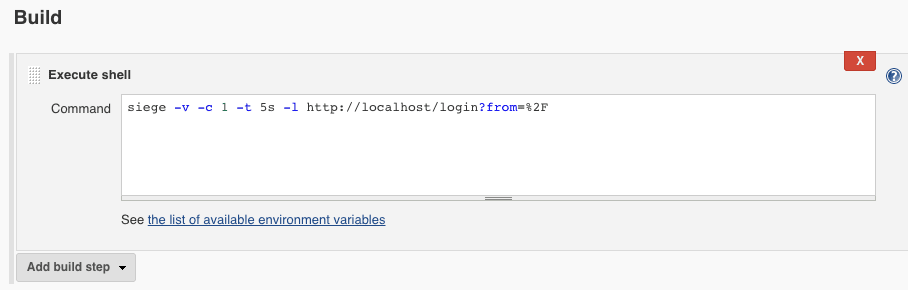
Build Script
For the build script, I just set up the test to run seige for 10s with a concurrency of 1. The test executes against a single URL.
Sample Output
Here’s a sample output from each test run.
Started by timer
Building on master in workspace /var/lib/jenkins/workspace/mytests/CachePreWarm
[CachePreWarm] $ /bin/sh -xe /tmp/hudson5180622479104364552.sh
+ siege -v -c 1 -t 5s -l http://localhost/login?from=%2F
** SIEGE 3.0.5
** Preparing 1 concurrent users for battle.
The server is now under siege...

Lifting the server siege...-       done.

Transactions:                     9 hits
Availability:                100.00 %
Elapsed time:                  4.93 secs
Data transferred:             0.02 MB
Response time:                  0.00 secs
Transaction rate:             1.83 trans/sec
Throughput:                  0.00 MB/sec
Concurrency:                  0.01
Successful transactions:           9
Failed transactions:                0
Longest transaction:             0.01
Shortest transaction:             0.00
For my later analysis, I used the /var/log/siege.log. It has a CSV seperated values for the parameters listed in the build output above. So I can consolidate the results for extracting patterns or troubleshooting issues.
2016-12-01 18:39:09,      7,       4.80,           0,       0.00,        1.46,        0.00,        0.01,       7,       0
2016-12-01 19:44:05,     10,       4.93,           0,       0.00,        2.03,        0.00,        0.01,      10,       0
2016-12-01 19:54:05,      7,       4.93,           0,       0.00,        1.42,        0.00,        0.01,       7,       0
2016-12-01 20:04:05,      7,       4.93,           0,       0.00,        1.42,        0.00,        0.01,       7,       0
2016-12-01 20:14:05,      6,       4.93,           0,       0.00,        1.22,        0.00,        0.00,       6,       0
2016-12-01 20:24:05,     10,       4.93,           0,       0.00,        2.03,        0.00,        0.01,      10,       0
2016-12-01 20:34:05,     12,       4.93,           0,       0.00,        2.43,        0.00,        0.01,      12,       0
2016-12-01 20:44:05,      9,       4.92,           0,       0.01,        1.83,        0.00,        0.01,       9,       0
2016-12-01 20:54:05,      6,       4.92,           0,       0.00,        1.22,        0.00,        0.01,       6,       0
2016-12-01 21:04:05,     10,       4.93,           0,       0.00,        2.03,        0.00,        0.01,      10,       0
2016-12-01 21:14:05,     10,       4.93,           0,       0.00,        2.03,        0.00,        0.01,      10,       0
2016-12-01 21:24:05,      5,       4.93,           0,       0.00,        1.01,        0.00,        0.00,       5,       0
2016-12-01 21:34:05,      6,       4.92,           0,       0.00,        1.22,        0.00,        0.01,       6,       0
2016-12-01 21:44:05,     13,       4.93,           0,       0.00,        2.64,        0.00,        0.01,      13,       0
2016-12-01 21:54:05,     13,       4.93,           0,       0.00,        2.64,        0.00,        0.01,      13,       0
2016-12-01 22:04:05,     19,       4.92,           0,       0.00,        3.86,        0.00,        0.01,      19,       0
2016-12-01 22:14:05,     13,       4.93,           0,       0.00,        2.64,        0.00,        0.01,      13,       0
Conclusion
Jenkins offers an excellent way to automate the running of synthetic tests. The tests could be run after a deployment or periodically. The script to be executed is configurable and it is easily possible to extend this test to use more complex tests like Selenium based checks for transactions. It’ll be interesting to see how this technology pans out.