
Building AI Agents with Pydantic AI - A Hands-On Tutorial
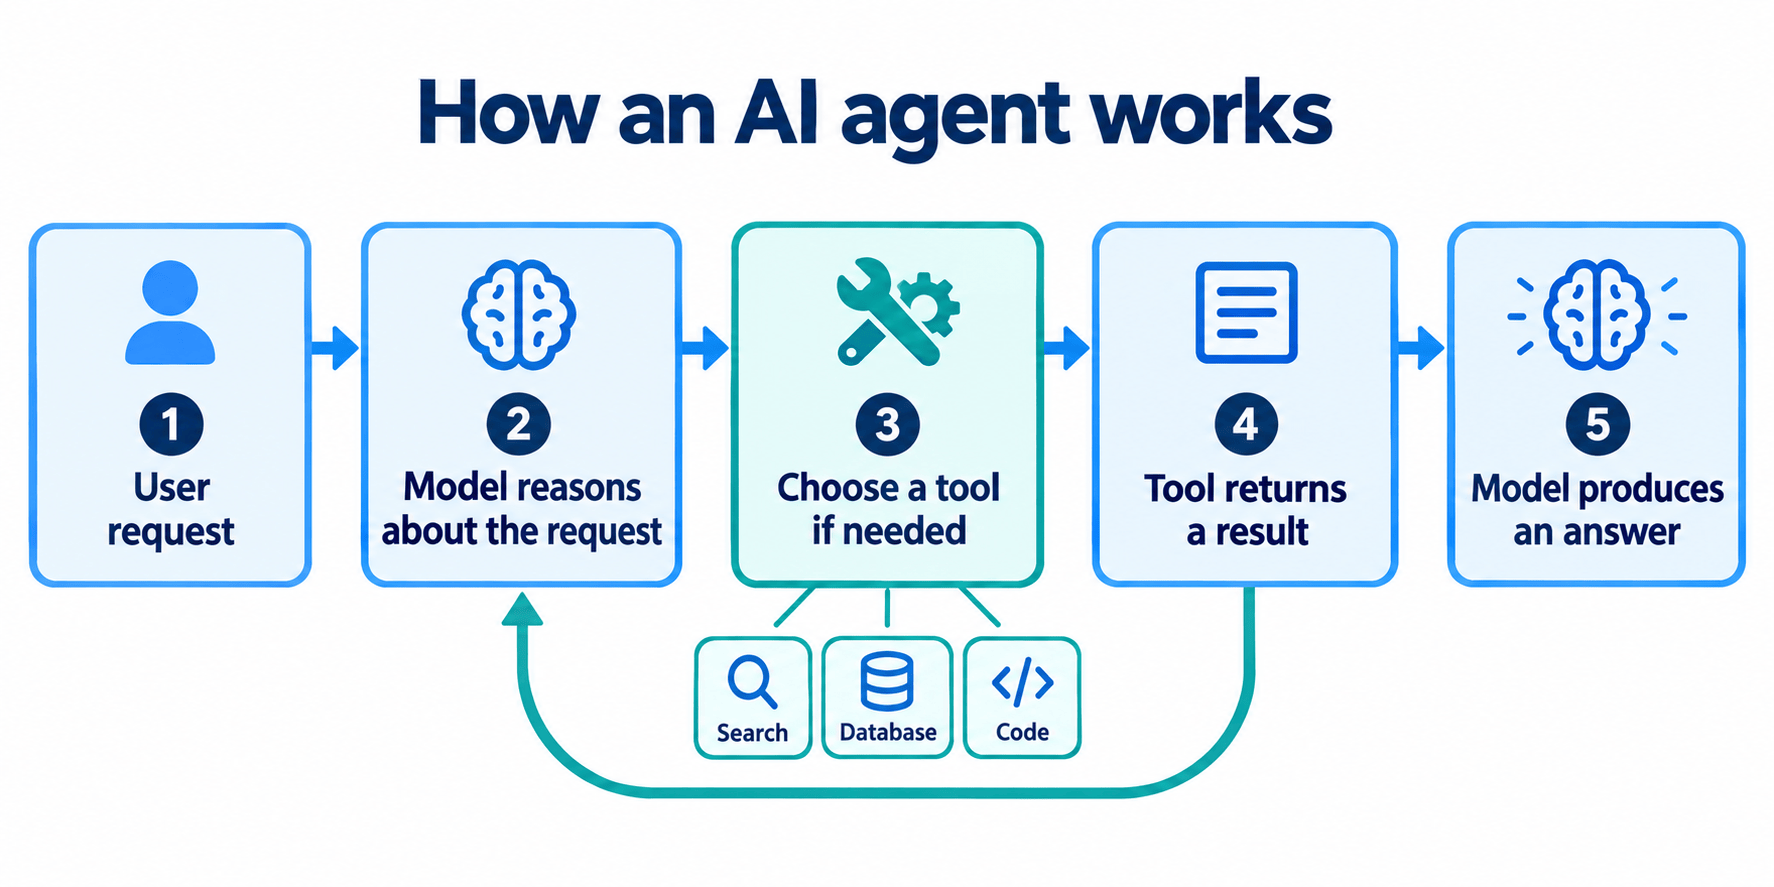
In my last few posts, I have been talking about agents from the outside - why production agents need engineering discipline and why routing matters more than picking one model. This time, I want to get my hands dirty.
In this post, I’ll walk through a set of small examples I wrote while learning Pydantic AI. We start with a single call to a local model and end with an agent that can search the web, browse pages, edit files, run code, serve an API and route questions to specialized agents. Each step adds exactly one new idea.
Disclaimer: I work for Glean as a Solution Architect. Opinions here are mine.
Why agents are different
A traditional program follows a path that the developer laid out in advance. Parse the input, call some functions, validate the output. Done.
An agent adds a decision step that the model makes at runtime. It can choose a tool, look at the result, change its approach and keep going until it has an answer. That changes what you are building. You are no longer encoding every branch. Instead, you are designing the things around the loop - typed tools, context, limits, validation and observability - so that a partly nondeterministic system still behaves in a bounded way.
That is the theme for the rest of this post.
The mental model: an agent is a typed loop
A basic LLM call looks like this:
prompt → model → text
An agent wraps a loop around the model:
prompt
  → model decides whether it needs a tool
  → tool runs
  → tool result returns to the model
  → model continues or produces a final answer
Pydantic AI gives that loop a Python interface. You declare the model, the instructions, the capabilities, the tool functions, the dependencies and, when needed, a structured output type. The key point is this: your Python code still owns the tools and the boundaries. The model only gets to choose when to use what you have exposed.
Keep this picture in mind. Every lesson below adds one more piece to it.
Why Pydantic AI
There is no shortage of agent frameworks. I picked Pydantic AI for a few practical reasons:
- It feels like normal Python. An agent is an object, tools are decorated functions and dependencies are a dataclass. There is no graph DSL or chain abstraction to learn before you can write your first tool.
- Types are the contract. Tool arguments, dependencies and structured outputs are all typed. The same Pydantic validation that guards your APIs now guards what the model sends to your tools and what it returns to you.
- It is model-agnostic. The same agent code runs against OpenAI, Anthropic, Gemini or a local OpenAI-compatible server like LM Studio. That matters if, like me, you care about routing between open and frontier models.
- Observability is built in. Logfire, from the same team, traces model and tool calls with a couple of lines of setup.
- It speaks MCP. External tool servers plug in as toolsets, so you are not locked into tools you write yourself.
It isn’t the only good choice. But it keeps the loop small and visible, and that is what you want when learning how agents actually work.
What we will build
All the code lives in my Pydantic AI tutorial repository. The numbered files 001 through 011 build up one capability at a time:
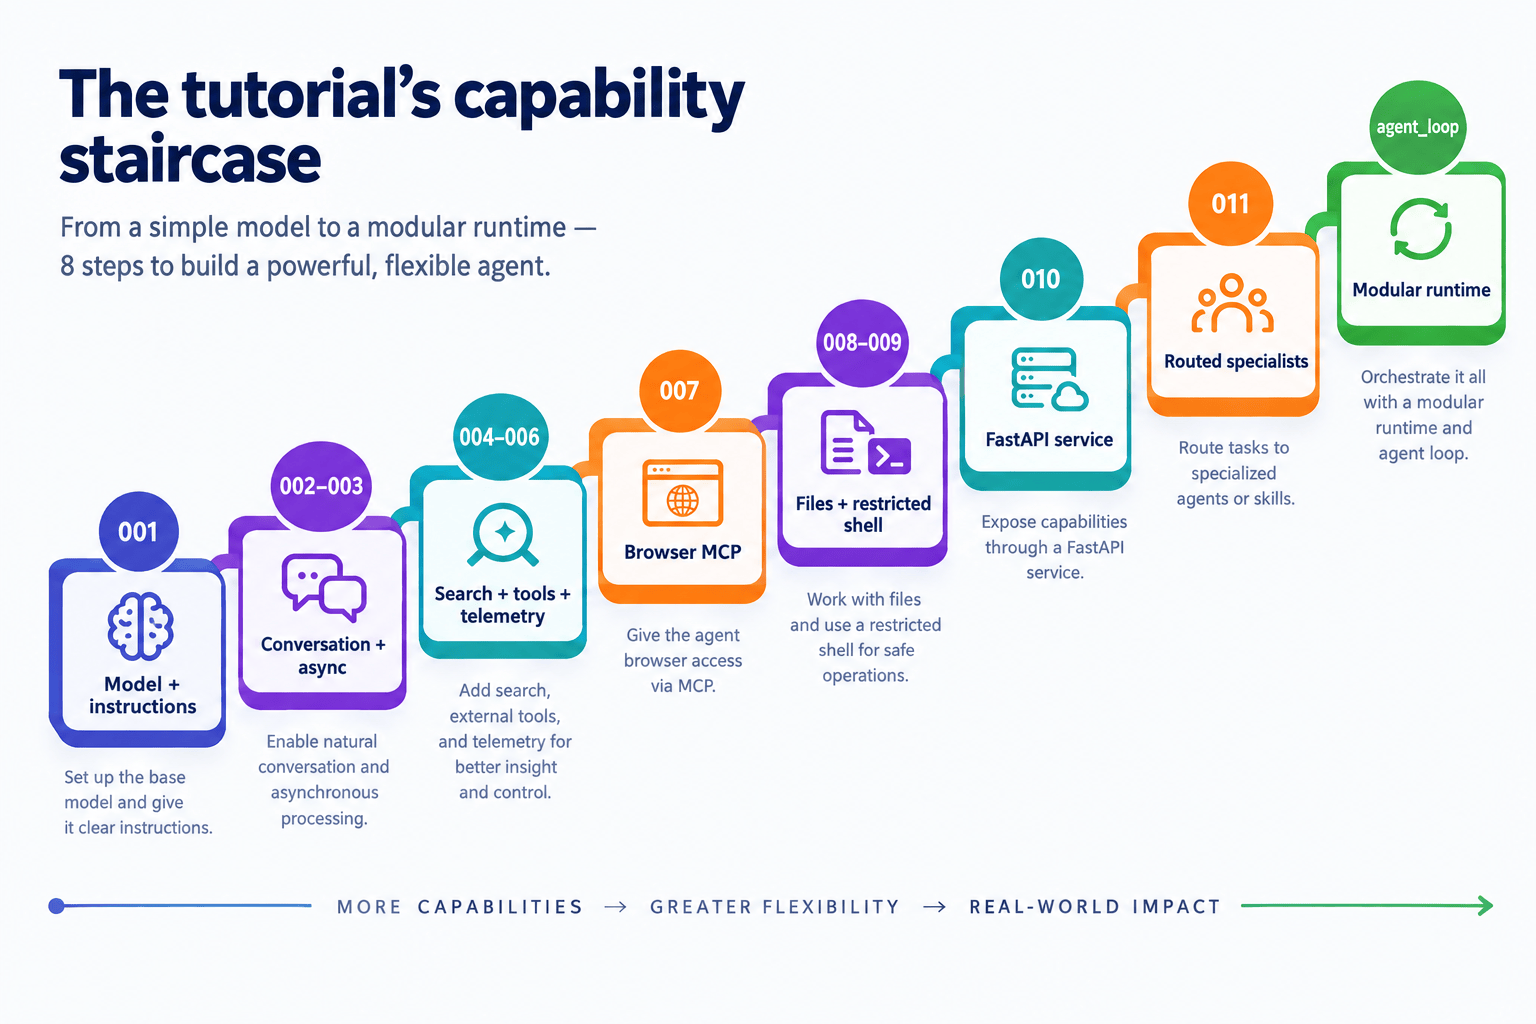
By the end, you’ll know how to:
- Point Pydantic AI at a local OpenAI-compatible model.
- Run an agent synchronously, asynchronously and as a conversation.
- Preserve message history between turns.
- Add built-in capabilities like web search.
- Register typed Python tools with
@agent.tooland@agent.tool_plain. - Trace model and tool calls with Logfire.
- Connect external tools through the Model Context Protocol (MCP).
- Give an agent bounded filesystem and shell access.
- Serve an agent through FastAPI.
- Route a prompt through a classifier to a specialized agent.
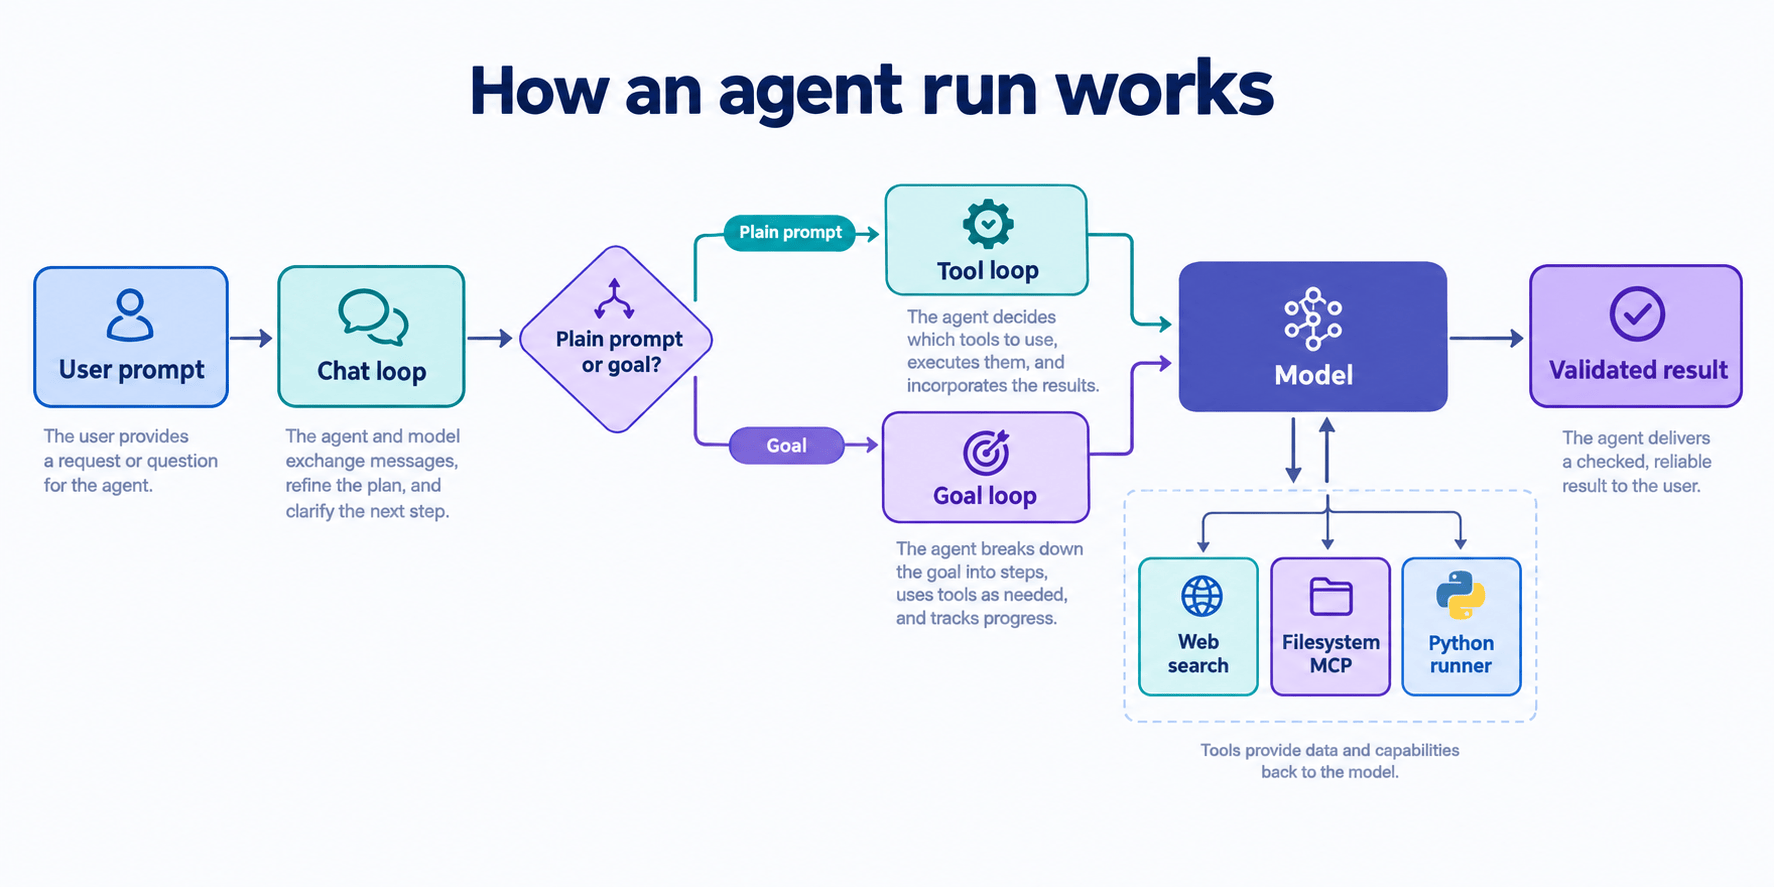
The last section looks is the agent_loop project. That’s where all these pieces come together into a small agent runtime with three distinct loops - a chat loop, a goal loop and the tool loop that Pydantic AI runs for you.
Setup
The repository targets Python 3.14+ and uses uv. The dependencies - Pydantic AI, Logfire, FastAPI, the MCP packages and the Jev SDK - are declared in pyproject.toml. I used LM Studio as the local model server for lessons 1-7 and 11.
1. Install dependencies
cd pydantic/pydantic-ai-tutorial
uv sync
2. Start a local model
Start an OpenAI-compatible server such as LM Studio at:
http://localhost:1234/v1
The examples use the model nvidia/nemotron-3-nano-4b with the API key lm-studio. The API key is just a placeholder that the local server accepts. Nothing is hard-coded in the scripts - the model name, endpoint and key all come from environment variables (see the next step), so you can switch models or endpoints without touching the code. In this case, I am using the model Namtron 3 Omni model. It is decent for small use-cases and supports tool-calling.
Insted of LM Studio, you can use any other service that can serve OpenAI compatible models. Ollama is another option as well. Of course, you can also plugin OpenAI’s API and directly hook into a paid service as well. If you’d like to work with Claude, the code will need to change.
3. Configure the environment
Every lesson calls load_dotenv() and reads its settings from a .env file in the tutorial folder. The repository ships an env.sample template, so you can start with:
cp env.sample .env
Then fill in your values:
MODEL_NAME=nvidia/nemotron-3-nano-4b
BASE_URL=http://localhost:1234/v1
API_KEY=lm-studio
SAFE_FILE_SYSTEM_FOLDER=./tool_access
TYPESAFE_API_KEY=<your Jev API key>
MODEL_NAME, BASE_URL and API_KEY are used by every lesson. SAFE_FILE_SYSTEM_FOLDER is needed from lesson 8 onwards, and TYPESAFE_API_KEY is only needed for the Jev router in lesson 11. Keep .env out of version control - it is gitignored in the repository.
Please treat SAFE_FILE_SYSTEM_FOLDER as a real security boundary. Point it at a dedicated folder - not your home directory and not the whole repository.
4. Run a lesson
Each numbered file is a complete script:
uv run python 001_hello_world.py
Most examples are interactive. Type exit or press Ctrl+C to stop.
Let’s get started.
Lesson 1 - The smallest useful agent
File: 001_hello_world.py
The first example has just three parts - a model, an agent and a call:
import os
from dotenv import load_dotenv

load_dotenv()

from pydantic_ai import Agent
from pydantic_ai.models.openai import OpenAIChatModel
from pydantic_ai.providers.openai import OpenAIProvider

model = OpenAIChatModel(
    model_name=os.environ.get("MODEL_NAME"),
    provider=OpenAIProvider(
        base_url=os.environ.get("BASE_URL"),
        api_key=os.environ.get("API_KEY"),
    ),
)

agent = Agent(
    model,
    instructions="""
    You are a friendly pirate.
    Keep your responses friendly but in pirate language.
    """,
)

result = agent.run_sync("Say hello and explain you are running locally")
print(result.output)
Here is what each piece does:
load_dotenv()pullsMODEL_NAME,BASE_URLandAPI_KEYfrom.env. Every later lesson builds its model the same way, so I won’t repeat this block.OpenAIChatModeldescribes which model to call.OpenAIProviderpoints the client at an OpenAI-compatible endpoint.instructionssets the agent’s behavior.run_syncblocks until the model finishes.result.outputholds the final answer.
Yes, it’s a pirate. But it is a useful baseline because there are no tools, servers or application code in the way. Just the agent abstraction.
Lesson 2 - Turn one call into a conversation
File: 002_simple_agent_chat.py
A single call is not very useful. So the second example wraps the agent in a REPL. The key addition is message history:
message_history = []

while True:
    user_input = input("\nYou: ").strip()
    # ... handle "exit" and empty input ...

    result = agent.run_sync(
        user_input,
        message_history=message_history,
    )
    print(f"Assistant: {result.output}")

    message_history = result.all_messages()
Notice that message_history is explicit. The agent does not magically remember earlier turns. Your application decides which messages go back to the model on the next run.
The example also catches exceptions at the REPL boundary. That way, one failed request does not take down the whole process.
Lesson 3 - Move to asynchronous execution
File: 003_simple_agent_async_chat.py
Before adding tools, we switch to async. Tools often wait on the network or on subprocesses, and the later lessons run MCP servers and a web API. All of that is much easier inside an event loop.
The conversation stays almost the same. Only the model call changes:
async def main() -> None:
    message_history = []

    while True:
        user_input = (await asyncio.to_thread(input, "You: ")).strip()
        # ... handle "exit" and empty input ...

        result = await agent.run(
            user_input,
            message_history=message_history,
        )
        # ... print result.output ...
        message_history = result.all_messages()

asyncio.run(main())
agent.run() is the async counterpart of run_sync(). Python’s built-in input() is blocking, so the example moves it to a worker thread with asyncio.to_thread. That keeps the event loop free while we wait for the user to type.
Lesson 4 - Give the agent a built-in capability
File: 004_simple_agent_async_with_tools.py
So far, the agent can only talk. Now it gets its first capability - local DuckDuckGo search:
from pydantic_ai.capabilities import WebSearch

agent = Agent(
    model,
    instructions="""
    You are a helpful assistant.
    Use web search when the user asks about current information
    or explicitly asks you to search.
    When using search, always include the source URLs in the answer.
    """,
    capabilities=[
        WebSearch(local="duckduckgo"),
    ],
)
The model can now decide that a question needs current information and call search. But notice who is in charge. The Python application attached the capability. The model cannot call arbitrary network code unless you give it the means to do so.
This lesson also prints result.new_messages(). That’s very handy while learning, because the final answer hides all the intermediate activity. Printing the messages shows you the request, the tool call, the tool result and the final response.
Instructions are part of the tool contract
Look closely at the instructions. They tell the model two things:
- When search is appropriate - current information or an explicit request.
- What the answer must contain - the source URLs.
Attaching a tool makes an action available. The instructions explain when and why to use it. You need both.
Lesson 5 - Add observability with Logfire
File: 005_simple_agent_async_with_tools_and_telemetry.py
Once you add tools, a single user turn can turn into multiple model calls and tool calls. Printing messages works for one run, but it does not scale. So the search agent gets two lines of instrumentation:
import logfire

logfire.configure()
logfire.instrument_pydantic_ai()
This is the point where I started treating the agent as a system that needs debugging, not just a function that returns text. The final answer alone is not enough to understand what went wrong.
Traces help you answer questions like:
- Did the model actually call search?
- How many model requests did one user turn produce?
- Did the tool fail, or did the model misunderstand the result?
- Which instruction or tool call led to the final answer?
One thing traces make easy to spot is a small local model that keeps searching over and over. So this lesson also tightens the search policy in the instructions: search no more than twice for one request, and once useful results arrive, answer instead of searching again. This is the instructions-as-contract idea from lesson 4, refined based on what the traces show.
Here is the output for a simple call that uses search.

Lesson 6 - Add a typed Python tool
File: 006_agent_async_with_multiple_tools_and_telemetry.py
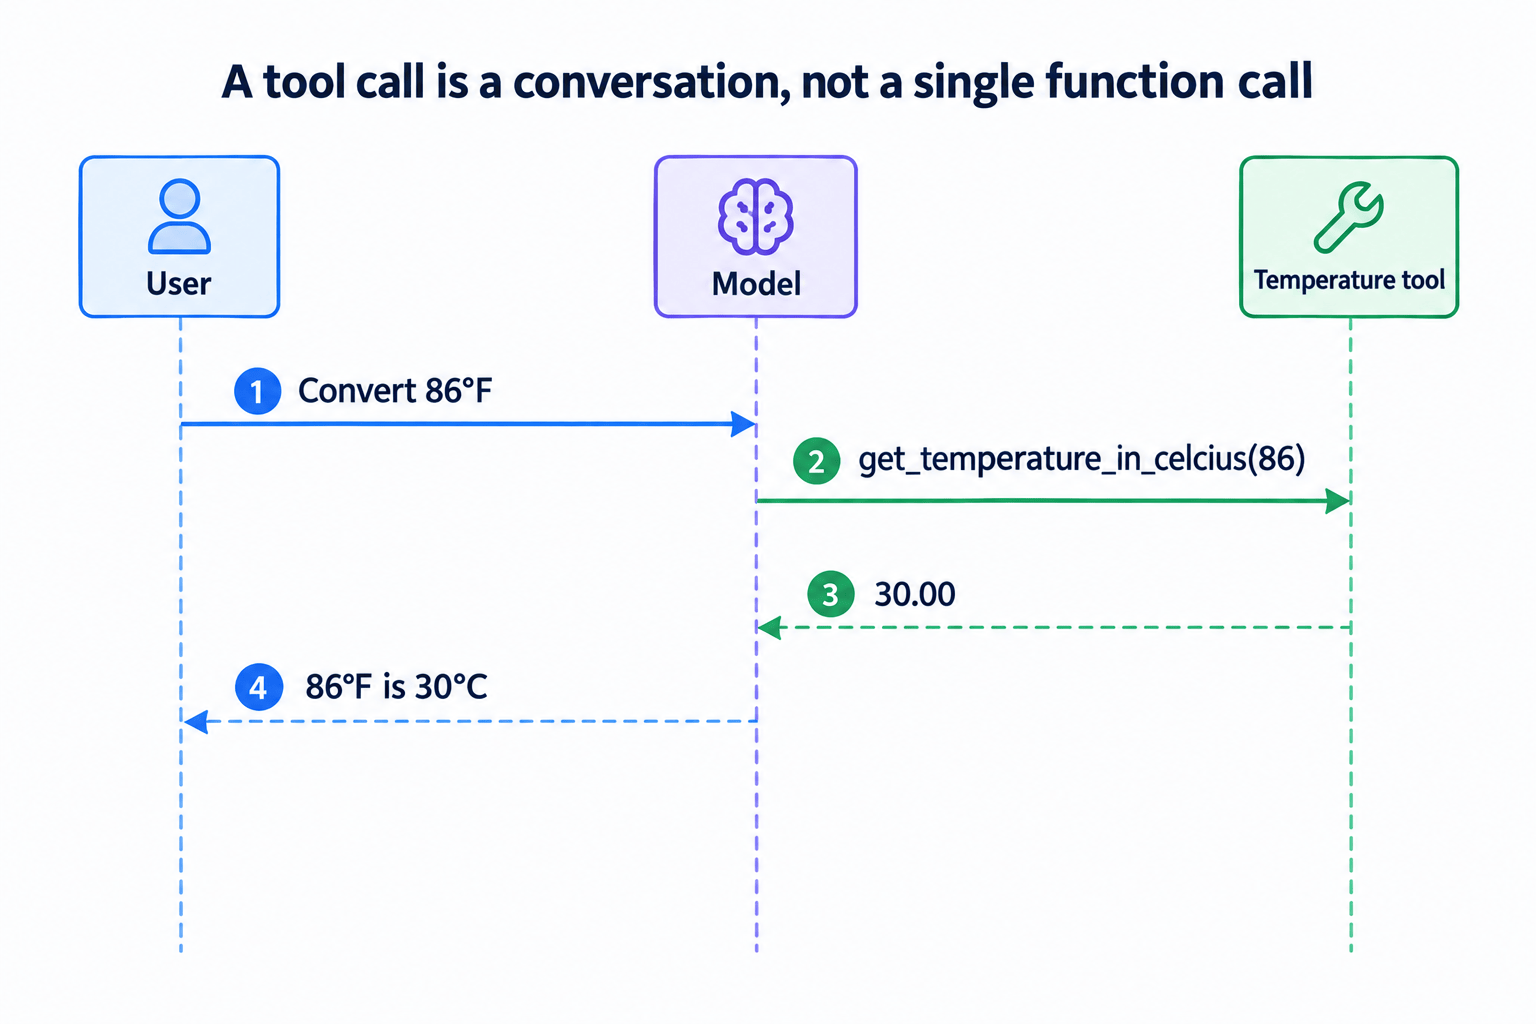
Built-in capabilities are nice, but the real power is in writing your own tools. Here, the agent keeps web search and gains a custom Fahrenheit-to-Celsius converter:
from pydantic_ai import Agent, RunContext

@agent.tool
async def get_temperature_in_celcius(
    ctx: RunContext[None],
    temperature: float,
) -> str:
    """Convert Fahrenheit to Celsius."""
    return f"{(temperature - 32) * (5 / 9):.2f}"
It looks like a regular Python function, and that’s the point. But the signature and the docstring are doing a lot of work:
- The type annotation tells the framework that
temperatureis a number. Pydantic validates it before your code ever runs. - The docstring becomes the tool’s description for the model.
RunContextis the hook for accessing dependencies and run-scoped state. We don’t use it here, but we will inagent_loop.- Because it is ordinary Python, you can test the calculation without a model.
The instructions also add one line: if the user asks for a temperature in Celsius, use the tool. Put together, this gives us a simple but complete tool-call loop:
@agent.tool vs @agent.tool_plain
Use @agent.tool when the function needs RunContext - dependencies or run-level state. Use @agent.tool_plain for a plain function that needs no context. You’ll see both later: the shell tool in lesson 9 uses @agent.tool_plain, while the run_python tool in agent_loop takes a RunContext so it can find the workspace folder.
Lesson 7 - Connect an MCP toolset
File: 007_agent_with_multiple_tools_and_telemetry_mcp.py
Writing every tool yourself does not scale either. What if someone has already built the tool? That’s where MCP comes in. The seventh example adds a browser through the Playwright MCP server:
from pydantic_ai.mcp import MCPToolset
from fastmcp.client.transports import StdioTransport

playwright_mcp = MCPToolset(
    StdioTransport(
        command="npx",
        args=["-y", "@playwright/mcp@latest", "--headless"],
    )
)

agent = Agent(
    model,
    # ... instructions ...
    capabilities=[WebSearch(local="duckduckgo")],
    toolsets=[playwright_mcp],
)
The agent connects to a server over a standard protocol and discovers whatever tools it exposes. In this case, the Playwright server lets the agent open and interact with web pages.
Once again, the instructions matter. They tell the model to use Playwright when the user asks it to browse or interact with a page. Without that line, a small model may not reliably pick the new tool even when it should.
Lesson 8 - Scope filesystem access
File: 008_agent_with_file_edit_access.py
Browsing is read-only. Now we let the agent change things. This lesson reads the allowed folder from the SAFE_FILE_SYSTEM_FOLDER environment variable and starts the MCP filesystem server with exactly that one folder:
workspace = os.environ.get("SAFE_FILE_SYSTEM_FOLDER")

file_system_mcp = MCPToolset(
    StdioTransport(
        command="npx",
        args=["-y", "@modelcontextprotocol/server-filesystem", workspace],
    )
).prefixed("fs")
The fs prefix makes these tool names easy to tell apart from the browser and other tools.
The important idea here is not “the agent can edit files.” It is “the agent can edit files inside one deliberately chosen folder.” For production, you would add authentication, authorization, audit logging and more validation around that boundary. Designing and implementing such contraints is what is called as harness engineering.
Lesson 9 - Build your own restricted shell tool
File: 009_agent_with_file_edit_bash_access.py
In lesson 8, the boundary came from someone else’s MCP server. In this lesson, we build the boundary ourselves. The filesystem MCP server is not attached here. Instead, the agent gets a small, explicit shell tool:
ALLOWED_COMMANDS = {"pwd", "ls", "cat", "find", "grep", "head", "tail", "git"}

@agent.tool_plain
async def run_workspace_command(command: str) -> str:
    """Run a limited read-oriented command in the agent workspace."""
    parts = shlex.split(command)
    # ... return early if the command is empty ...

    program = parts[0]
    if program not in ALLOWED_COMMANDS:
        raise ValueError(f"Command not allowed: {program}")
    # ... path checks, minimal PATH, workspace cwd, 20-second timeout ...
The full function adds several guardrails:
- Only programs on the allowlist are accepted.
- Absolute paths and
..traversal are rejected. - The subprocess runs with a minimal
PATH. - The working directory is the configured workspace.
- The command times out after 20 seconds.
This is much safer than handing a model a generic shell. But it is still not a sandbox. Commands like cat and git can still read anything inside the workspace, and the process runs with your user’s permissions. Secrets and process-level permissions need to be handled separately.
Lesson 10 - Serve the agent as an API
File: 010_agent_as_an_api.py
Until now, every agent lived inside a terminal REPL. Real applications need an API. The tenth example combines the browser (lesson 7) and the filesystem (lesson 8) and puts them behind FastAPI. The request and response models make the boundary explicit:
class ChatRequest(BaseModel):
    prompt: str = Field(min_length=1)
    session_id: str | None = None

class ChatResponse(BaseModel):
    output: str
    session_id: str
Remember the explicit message_history from lesson 2? Here, it pays off. The endpoint simply keeps a history per session:
sessions: dict[str, list[ModelMessage]] = {}

@app.post("/chat", response_model=ChatResponse)
async def chat(request: ChatRequest) -> ChatResponse:
    session_id = request.session_id or str(uuid.uuid4())
    message_history = sessions.get(session_id, [])

    result = await agent.run(
        request.prompt,
        message_history=message_history,
    )

    sessions[session_id] = result.all_messages()
    return ChatResponse(
        output=str(result.output),
        session_id=session_id,
    )
A few operational ideas show up here:
/healthgives a simple liveness check.session_idlets the client continue a conversation.- FastAPI’s lifespan keeps the Playwright and filesystem MCP subprocesses alive for as long as the server runs.
The session store is deliberately simple and in memory. Restart the server and the chat history is gone. A production service would use a durable store, enforce session ownership, apply request limits and avoid returning raw exception messages to clients.
Since the filename starts with a digit, run it directly:
uv run python 010_agent_as_an_api.py
Then open http://127.0.0.1:8000/docs for the auto-generated OpenAPI UI.
Lesson 11 - Route prompts to specialized agents
File: 011_agent_with_jev.py
So far, we’ve had one agent trying to do everything. In my post on intelligence routing, I argued that one model for everything is a trap. The same holds for agents. So this example defines three agents, each for a different audience:
deep_research_agentfor detailed, technical answers.elementary_answer_agentfor short, jargon-free answers.general_answer_agentas the default.
A Jev classifier picks among them. As I wrote in that post, Jev is a “System One” model - it doesn’t generate text, it just returns a typed decision. That’s exactly what a router needs:
from typesafe_sdk import Choice, TypeSafeClient

jev_client = TypeSafeClient()

def identify_agent_type(prompt: str) -> str:
    response = jev_client.system_one(
        state=prompt,
        questions={
            "query_type": Choice(
                instructions="What kind of a prompt/question is this?",
                criteria={
                    "elementary": "Simple question suitable for elementary children",
                    "research": "A deep research problem suitable for advanced students",
                    "general": "Suitable for any audience",
                },
            )
        },
    )
    return response.answers["query_type"].choice
TypeSafeClient() picks up TYPESAFE_API_KEY from the environment, so the key stays in .env alongside the model settings.
The routing map itself is deliberately boring - and that’s a good thing:
agent_type_mapping = {
    "elementary": elementary_answer_agent,
    "research": deep_research_agent,
    "general": general_answer_agent,
}

agent_type = identify_agent_type(user_input)
selected_agent = agent_type_mapping.get(
    agent_type,
    general_answer_agent,
)

result = await selected_agent.run(
    user_input,
    message_history=message_history,
)
All three agents share the same local model and web search capability. What changes is the instructions, not the runtime. In a real-world scenario, we could change model, instructions, capability and entire setup for each decision path.
Putting it all together - agent_loop
Directory: agent_loop
The numbered lessons each teach one capability. agent_loop is where I combined them into a small, modular runtime. It drops the routing and the browser and focuses on a single agent that can search, work with files and run code. It also introduces two new ideas that the lessons did not cover: dependency injection and a goal loop driven by structured output.
Here is how the code is split:
| Module | Responsibility |
|---|---|
config.py |
Load .env, build the model, resolve the workspace and configure Logfire. |
deps.py |
Define AgentDeps, a dataclass holding the workspace path. |
search.py |
Expose local DuckDuckGo search and its instructions. |
file_access.py |
Start the MCP filesystem server, filter its tools and prefix them with fs. |
code_runner.py |
Expose run_python through a FunctionToolset. |
agent.py |
Construct the agent and implement the goal loop. |
main.py |
Run the REPL, choose chat vs goal mode and preserve chat history. |
The tool modules don’t import each other. agent.py is the one place that wires the model, capabilities, toolsets, instructions and dependency type together.
The three loops
To me, this is the most important design idea in the project. There are three different loops, and each one has a different owner:
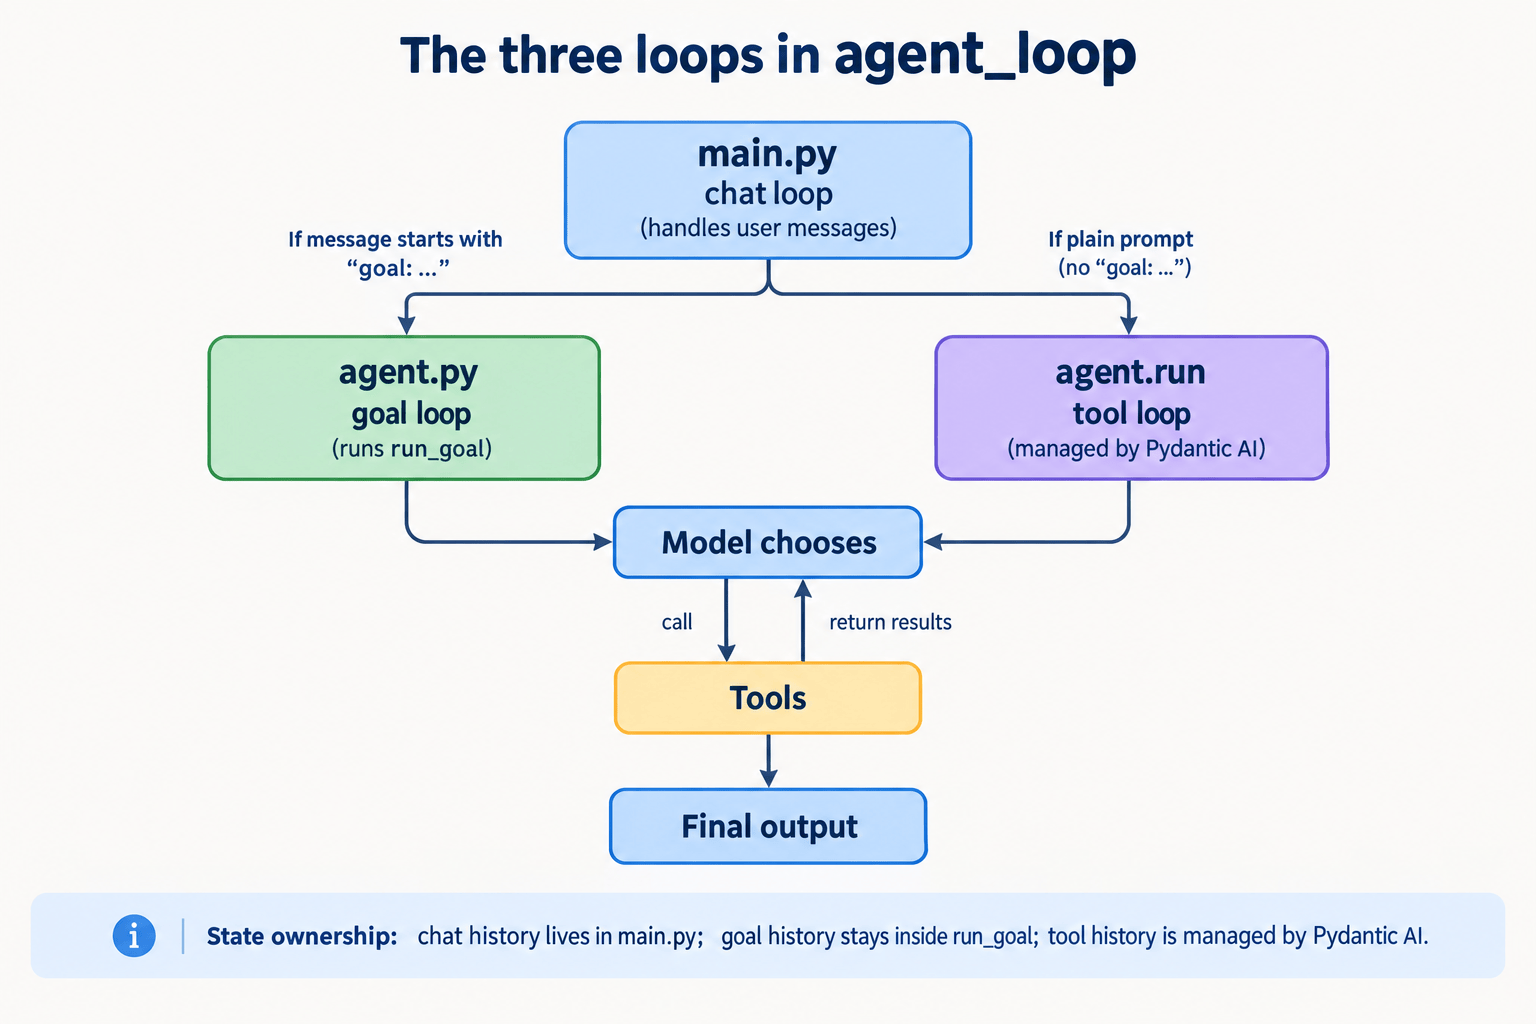
1. The chat loop
main.py owns input, exit handling, printing and conversation history:
async with agent:
    while True:
        # ... read input, handle "exit" and empty lines ...

        if user_input.startswith("goal:"):
            await run_goal(user_input.removeprefix("goal:").strip(), deps)
            continue

        result = await agent.run(
            user_input,
            message_history=message_history,
            deps=deps,
            usage_limits=UsageLimits(request_limit=15),
        )
        # ... print result.output ...
        message_history = result.all_messages()
The async with agent block matters because the MCP subprocesses need to stay alive for the whole session. A normal prompt updates the chat history. A prompt that starts with goal: hands off to the goal loop, and the goal loop’s internal history does not get written back into the chat.
2. The goal loop
Some tasks take more than one step. run_goal turns one user objective into at most five agent runs:
class StepReport(BaseModel):
    done: bool = Field(
        description="True only when the whole goal is complete and verified."
    )
    summary: str = Field(description="What you did in this step.")
    next_step: str | None = Field(
        default=None,
        description="What you will do next if not done.",
    )

MAX_STEPS = 5

async def run_goal(goal: str, deps: AgentDeps) -> None:
    history = []
    prompt = goal

    for step in range(1, MAX_STEPS + 1):
        result = await agent.run(
            prompt,
            message_history=history,
            deps=deps,
            output_type=PromptedOutput(StepReport),
            usage_limits=UsageLimits(request_limit=15),
        )

        report = result.output
        history = result.all_messages()
        # ... print report.summary ...

        if report.done:
            return

        prompt = f"Continue toward the goal.\nYour planned next step: {report.next_step}"
    # ... report that MAX_STEPS ran out ...
The goal loop keeps its own history because it’s an internal workflow. And instead of chat text, it asks the model for a StepReport. This is where typed output really shines. The host program gets a reliable signal - keep going, or stop because the goal is done - without parsing free text and hoping the model followed instructions.
3. The Pydantic AI tool loop
Inside every agent.run, Pydantic AI runs the model/tool conversation for you. This is the same loop from the mental model at the top of the post:
agent.run
  → model receives the user prompt and available tools
  → model requests zero or more tools
  → Python/MCP tool executes
  → result is sent back to the model
  → model either calls another tool or returns output
This is why a single chat turn can produce several model requests even though the application calls agent.run() only once. It’s also why the request_limit=15 usage limit is there - it caps this inner loop.
Dependency injection with AgentDeps
Now for the first new idea. The dependency object is intentionally tiny:
@dataclass
class AgentDeps:
    workspace: Path
The agent declares it with deps_type=AgentDeps. A dynamic instruction then tells the model where the workspace is:
@agent.instructions
def workspace_hint(ctx: RunContext[AgentDeps]) -> str:
    return (
        f"The workspace folder is {ctx.deps.workspace}. "
        "Always pass absolute paths inside this folder to the fs_ tools. "
        f"Code run with run_python executes in "
        f"{ctx.deps.workspace / 'scratch'}."
    )
This is much better than baking runtime state into a global prompt string. The host application builds AgentDeps once, passes it to each run, and the tools receive the same object through RunContext. This is the RunContext hook from lesson 6, finally put to use.
Configuration and the local model profile
config.py loads the model settings from .env, with one twist - it turns off JSON-object mode:
model = OpenAIChatModel(
    # ... model_name and provider from .env, as in lesson 1 ...
    profile=OpenAIModelProfile(
        supports_json_object_output=False,
    ),
)
Why? It’s a workaround for the local model. The goal loop uses PromptedOutput(StepReport), which asks the model to return JSON in normal message text and then validates it. With JSON-object mode on, the local server rejected the response_format field in the request.
The general lesson here: “OpenAI-compatible” describes an interface, not identical behavior across every model server. Model profiles let you describe those differences explicitly instead of hacking around them.
Filesystem tools: filter before exposing
file_access.py builds on lesson 8. It starts the same MCP filesystem server, but then exposes only a chosen set of operations:
FS_TOOLS = [
    "read_text_file", "write_file", "edit_file",
    "list_directory", "search_files", "get_file_info",
]

file_tools = (
    MCPToolset(
        StdioTransport(
            command="npx",
            args=["-y", "@modelcontextprotocol/server-filesystem", str(WORKSPACE)],
        )
    )
    .filtered(lambda ctx, tool_def: tool_def.name in FS_TOOLS)
    .prefixed("fs")
)
The root, the filter and the prefix each solve a different problem:
- The root limits where the server can operate.
- The filter limits which operations the model can request.
- The prefix avoids name collisions with other tools.
Running Python - safe enough for a tutorial
code_runner.py takes the idea from lesson 9 one step further. Instead of a fixed list of commands, the agent can now run Python that it writes. The run_python tool writes the model’s code to workspace/scratch/snippet.py, runs it with the current interpreter, enforces a 15-second timeout and keeps only the last 2,000 characters of output - that’s where the traceback ends.
These controls reduce risk. They also make failures easier for the model to fix on its next try. But let me be very clear - they do not make arbitrary code execution safe. The subprocess inherits the parent environment, including any secrets in it. For production, run untrusted code in a real sandbox with restricted permissions, resource limits, network policy and secret isolation.
Search policy as reusable instructions
Finally, search.py keeps the search capability and its rules together:
Before you go to production
The tutorial is intentionally hands-on, and several examples hand the model some powerful capabilities. Before deploying anything similar, I would make sure to:
- Set explicit request, tool-call, token and time limits.
- Treat tool docstrings and type hints as part of the model-facing API.
- Keep filesystem access inside a dedicated, authorized workspace. Use a docker instance as a sandbox to bring up and tear down after a session.
- Filter MCP tools rather than exposing every server operation.
- Never treat an allowlist as a complete shell sandbox.
- Run model-written code in an isolated execution environment.
- Store chat history durably only with session ownership and retention controls.
- Avoid returning raw exception messages from an HTTP API.
- Instrument model calls, tool calls, retries and latency.
- Test the tool functions independently of the model.
- Add approval gates before destructive file, browser or external-system actions.
If this list looks a lot like the SDLC checklist from my Beyond the Vibes post, that’s not an accident.
Final thoughts
Prompts and providers will change. What carries over from these examples is how the responsibilities are split:
- Pydantic AI owns the model/tool loop.
- Your Python functions own the deterministic actions.
- MCP connects external tool servers through a standard interface.
- Dependencies carry runtime state without global variables.
- Logfire makes the execution visible.
- FastAPI turns the agent into an application.
- Routing lets specialized agents serve different audiences.
agent_loopcomposes these pieces with explicit chat and goal control flow.
My advice: start with 001_hello_world.py, change one thing and run it. Then keep going until you can explain not just what the agent answered, but which loop made the decision, which tool ran, what context it had and where the safety boundary lives. That’s when you’ve moved from vibes to engineering.